Loving the vintage vibe!

Here's where I'll share my obsession with vintage fabric! It's taking over my house!

I'll sharing with you my favorite fabrics, my 'adventures" in dressmaking using vintage patterns, some home furnishing ideas and no doubt I'll be telling you about any exciting finds! Love to hear about your vintage adventures too!

My first Shop was AudreysCat ( online shop May 2010) , but my new logo / name - WittyDawn , arrived Jan 2014.

I hope you'll have time to browse my shops too !

Saturday 10 October 2015

DIY Custom made Ironing Board for my Studio !

So this DIY Custom made Ironing Board was our project today! insprired by many similar things on Pinterest.

Requirements:
  • Reusing items we had already if possible
  • Specific size  - 45cm wide  but not too long, and higher that normal as I'm quite tall
  • Easily movable
  • Maximising storage


We did have to buy wood for the top, casters, wadding and metalized ironing board cover BUT re-used :
  • An ikea unit that had been given to us and which we had modified.
  • Old shelving wood left over from out kitchen refurbishment
  • Fabric that I had already 
It was a joint project !
OH cut wood to shape, bolted on lockable casters and added wood panels on each side to increase height.

I came up with the design and then - using my SO SO useful staple gun - added wadding and ironing board cover to top and then finished it with a pretty cotton fabric. TOP TIP - if you are going to staple a cover on remember you don't want staples to catch fabric if you are in habit of ironing items over the end of your ironing board hence I covered the under side with some handstitched fabric ( not the WHOLE underside just the end piece ! )

Very pleased with the new addition to my studio! I think the total cost was about £40 for the new items.

I may paint it but it looks pretty good as it is so that may never happen!


Tuesday 8 September 2015

A New Kitchen with actual NEW things for a change....albeit still a bit RETRO!

Now if you follow this blog you will by now know that I am very keen on a bit of vintage/recycling/upcyling. This applied to my so called 'temporary' kitchen 7- 8 yrs old. We  used Ikea Varde freestanding units because we'd had them before and they are ACE. Some from ebay, one as a sale/second and a couple new. We sourced a sink from ebay and reused all kinds of beech worksurfaces - all different height! and we reused exiting appliences .  It cost us about £1400 in total.
And jolly nice it was too! .... but my slightly dodgy back demanded a higher oven ( when it's bad I have had to kneel down to get stuff out of oven and lift up on to counter ! NOT GOOD!)  and I had a 25 yr savings plan to play with so....

We are working on a new kitchen !!!

This is the progress so far - I am awaiting granite ( whoop!) worktops and then my builder ( and good friend ) will be back to do lots of inventive carpentry finishing touches. We have no working sink in the kitchen yet and no hob BUT we do have a utility sink and a working dishwasher and new oven so not slumming it by any means . I STILL have more painting to do !

Upcycling is still a feature to some extent - one Ikea Varde unit remains in place and will get a blue paint job. Two other Varde units and some shelving has  moved to the shed to form a work table/area. Several other kitchen items have been popped onto ebay to continue to serve elsewhere :) Kitchen bits! 

I will name check all our suppliers when I post a final update when it is finished - but they have ALL been excellent so far.  I will also cover what inspired the colour choices ... hint: that car boot £1 vintage wallpaper that you can spot on right!

I have a deadline of the 25th Sept as I am hosting a Macmillan Coffee morning but I think we will make it....

Friday 7 August 2015

A Stylish Swedish Holiday Home !

So we have recently returned from a super holiday in Sweden - we have a bunch of holiday photos to edit and recommendations of things to do but that will follow shortly....

We stayed in the beautiful ( and I suspect rather upmarket?) Nacka area, lovely houses set in heavily wooded settings with great gardens. Unlike here in the UK people seem to not put up fences/ walls etc so there was a shared view aspect to their gardens which was appealing and made the most of the great location. There was a supermarket a short drive away and bus stop nearby too ( walking distance) . However we travelled by ferry into Stockholm and out to the islands from the local ferry point a very short drive away.

Well what super holiday home we had !! - lots of Ikea ( naturally...) and lovely  colours! very stylish :). The grey and white scheme with coral touched was particularly beautiful in the first floor living area but all the rooms were beautifully styled. This was a family home and so I won't share pictures of bedrooms/ bathrooms but they were all to this standard, and very clean and tidy. Obviously I rather coveted the vintage sideboard ...

The co-ordinated theme extend to the garden with knowledgable planting relying on structural forms with a green/grey/purple pallette.There was a lovely large decking area to the rear where we had breakfast and a balcony across the front of the house.
This was perhaps the most stylish holiday home we have stayed in and we thank our hosts for a delightful stay ! You can check it out here Holiday Home in Nacka - we'd recommend it !

Tuesday 7 July 2015

I've been making clothes from curtains again ....

So I've been hoarding this curtain fabric for a while now ... lush isn't it !


FINALLY I decided to get on an make something for an event at which I had a stall. It usually takes something like this with a deadline to make me get on with a project! I must say I was pretty pleased with how it turn out and I got lots of lovely comments.


The dress was adapted from a combination of a couple of pattern and the cape pattern was from Sew Vera Venus  found on a great resource called The Vintage Pattern Files 

( Edit: Since making this cape I've had lots of requests to make more - however the pattern is not one I created so I asked the lovely Jeanne of Sew Vera Venus  if I could use it to make some to sell on and she has very kindly given me permission. A very charming and talented lady - I do urge you to check out her site. Contact me if you would like a cape in one of my vintage fabric! )


NOT SHOWN: With it I had a vintage leather handbag and green suede 40s style shoes - the latter came from Hotter shoes who surprisingly do some lovely comfortable styles that work really well with a vintage look!
The outfit was finished with a red hat I commisioned from the talented Sophie at Imogen's Imagination 


( photos courtesy of my lovely friend Sheila of Sheuniquevintage )


Friday 12 June 2015

A Tale of a Little Oak Tree...

Once there was a lovely couple - they worked their allotment together for many, many years . They grew sweetpeas and sold them to pay for an annual holiday and they were always happy to stop and chat. They also grew an little Oak tree, they pruned it to keep it little  - like a bonsai oak 'lollipop'!.

Time passed and many years went by ... but eventually and within a few months of one another... they too passed... and went on to garden in the 'undiscovered country' ....

The little tree stayed on the allotment but it's future was uncertain ... so it came to live with us.

It settled in well and coped with it's move but last summer had to move again .... it didn't like this 2nd move and it looked as if it's time too had passed....

BUT.... you never can tell... let's see what happens next Spring we said.

This time the leaves came and looked stronger but it was clear that lots of it's little branches and twigs had died. I had to be brave and cut out all the dead wood ( ... life is like that sometimes....).


While it's shape has changed radically ,  I hope it's original custodians will approve of our attempts to keep it going , but in my mind it will always be their little Oak Lollipop tree :)

Friday 29 May 2015

Studio update - nearly there !

A quick update!

The roof is on and the next step is putting the windows and doors in .


And my quest for recycled furniture continues ....  the trolley was £2 from a carboot BUT may end up in my kitchen ... and the map chest was £90 , it had a date ot 1969 stamped inside :)


Lots of furniture renovations to do!

Wednesday 6 May 2015

The builders are in..... and working hard on my Sewing Room!

Exciting times ahead - no longer will my poor family have to put up with piles of vintage fabric EVERYWHERE...

The builders have started! and I will soon have a dedicated hobby/craft room with a HUGE cutting table and all my vintage fabric will be in one place. When I make a dress I will no longer have to do the 'house sewing circuit' - YOU know the one... cut it out downstairs on dining room table, sew it in tiny box room, try it on my bedroom and repeat.. and repeat....

In the meantime I am acquiring 'projects' to furnish my space DAILY and each fabric I pick up is THE one on which to base my colour scheme , until the next one comes along that is ...

Now whilst you might think 'lucky girl' ... well ... yes indeed!... but.... this is the result of a savings plan that dates back  25 YEARS !!! .... so I have waited a while ;)

My objective is to furnish it as much as possible from recycled items and thrifted finds but even so the pennies only stretch so far - and realising just what an INSANE amount of fabric I have I have been selling some on via ebay - if you like vintage fabric you might like to check it out ?


This is what I have listed on Ebay this week !


At the moment I am on the lookout for a Architects Plan/ Map chest - to store my patterns and my artwork . The latter is 'stored' under an armchair at the moment - NOT ideal.

I'm also after either an Ercol or a Lloyd Loom chair as well. Then - in theory - I am sorted ( ish... famous last words .... )

Watch this space ....

Wednesday 25 March 2015

Want to make the Great British Sewing Bee 50s wrap dress - hints and tips !

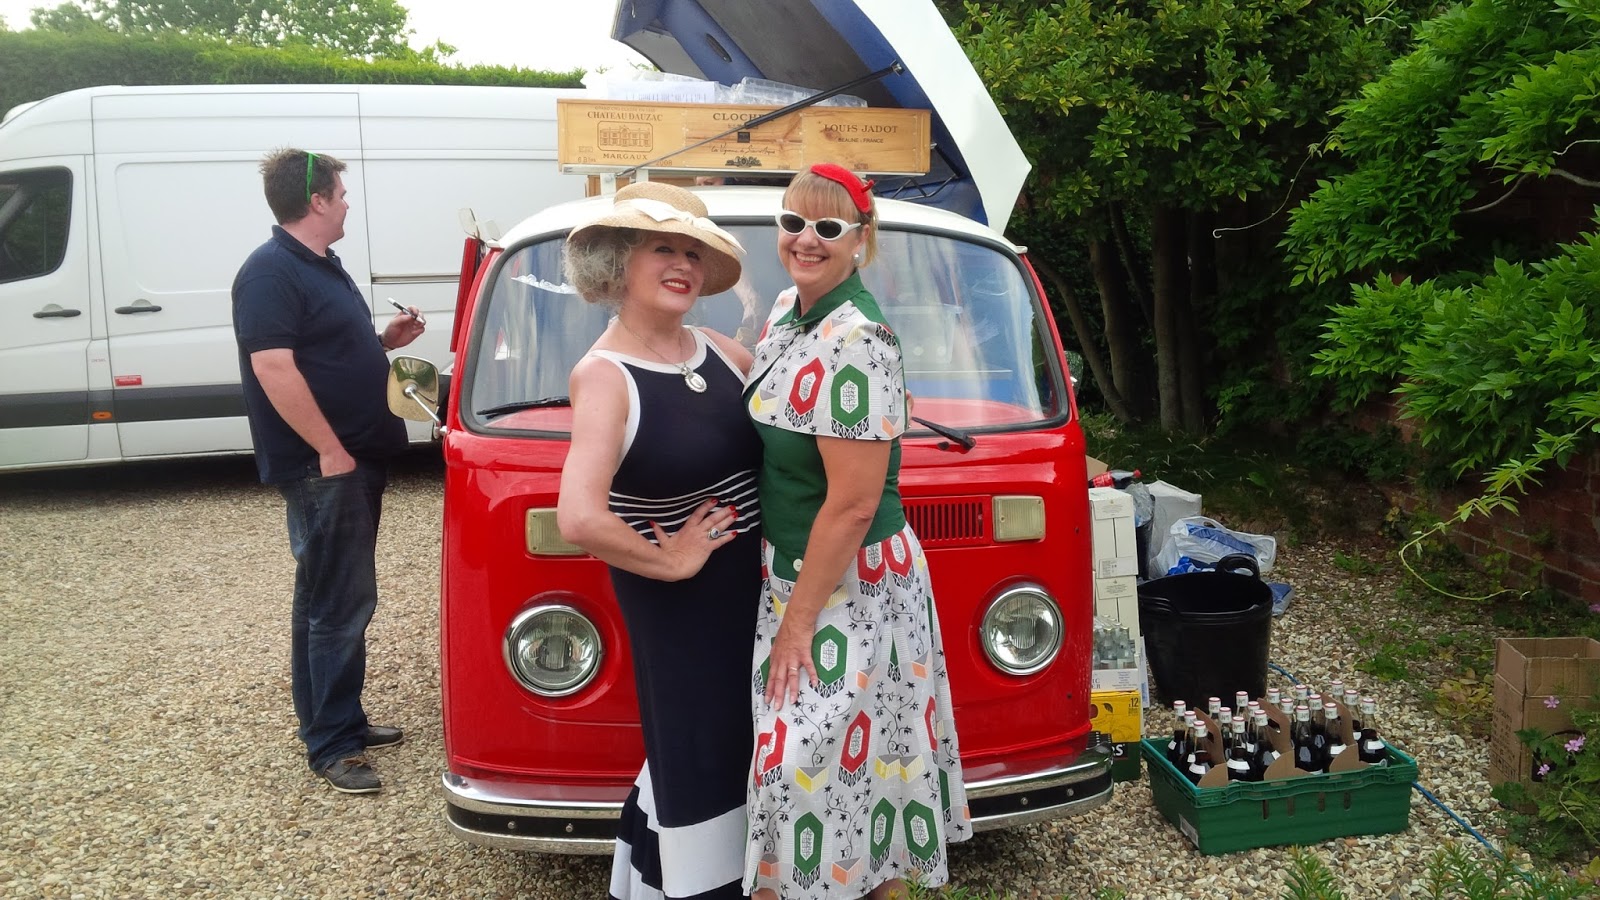
Firstly this was indeed a fun dress to make - and having made it yes I think I could happily run another up in a couple of hours.....and I intend to do so maybe with some design tweaks too!

As I am a fairly rubinesque size 16 and no longer in the first flush of youth , small waisted/big skirt designs are not always the MOST flattering look for me but the wrap/high waist design did seem to do me a few favours - OH seemed to approve anyway! 

I'm not going to do a step by step guide - you'll need the pattern for that - Butterick B4790 - BUT I am going to pass on what I hope will be some useful advice which might help you end up with a dress you'll be happy with .

1. This design comes up SMALL on the waist in my opinion. Measure your waist and use that to determine the size you need against the ACTUAL pattern piece - do not be surprised if you go up a couple of  sizes from your size in a modern garment. This is quite often the case in vintage patterns - even reissued ones. Unhelpfully the pattern has NO info' relating size to body measurements on the back of the packet! SO be careful f you can get into modern, often stretch'y size 16 jeans you ain't necessarily gonna get into a size 16 version of this dress !!

2. Choose a fabric with some body to it - by that I mean stiffness. A floppy fabric will not give you that nice 'sticky out ' 50s shape to the skirt or show that bodice shape as well. I used a heavier weight cotton - ( a rather nice find in a charity shop - grey plaid on on side, red on the other). I think this would be a knock out in raw/curtain weight silk / silk mix as well.

3. You might think you can put a net petticoat under that skirt - sorry nope - the under skirt/front is a closer fit than you might realise . HOWEVER I think it entirely possible to alter the pattern to have the underskirt as a fuller/lace/netted petticoat. I might have a go at this sometime!

4. Bias binding point 1 - 9 metres should be enough if you follow pattern exactly. I however wanted bias binding on overskirt hem and I didn't bother bias binding sides and hem ( where I used lace instead) of the underskirt. For this modification to the pattern I used 10.5 metres.

5. Bias binding point 2 - I would suggest using a fabric/bias binding combination where your fabric is stiffer/has more body that your bias binding. If you use a softer/thinner fabric with a coarser bias binding I think you could risk a twist in those front edges - which you want to keep nice and straight !

6. Bust darts ! I made this up , tried it on and bust darts tips were at least an inch higher that where they should be. OK - this MAY be just me LOL ! BUT remember this pattern was styled to 1950s undergarments and they tended to haul your 'ladies' up quite high and make 'em pointy . So unless you do the FULL vintage look with period appropriate bra/corsetry you may have to adjust the bust dart slightly .

I hope these tips help you out - I would certainly make this again and I look forward to wearing it when the weather gets just a bit warmer!

( BTW - The red comes over the shoulder more on my dress as I tweaked it to have some red showing on the front shoulder - If you follow the pattern exactly and use two contracting fabrics you won't get the same effect as on my dress )

EDIT:My estimated size info' on waist measurements. Max waist size, assuming front edges should meet and allowing 1 inch for narrow hem on back seam.

Size 22 - 35 inches
Size 20 - 33 inches
Size 18 - 31 inches
Size 16 - 29 inches

I have based this on actual pattern measurement from my size 16 -22  pattern . 

Thursday 19 March 2015

Sometimes you gotta LET IT GO....

So the thing is I've been lucky with my vintage thrifting/hunting recently....

I found this lovely set of Poole Twin Tone in the colour that I collect in a local charity shop
 ... and - as usual... I've been TOTALLY unable to pass by some fabulous fabrics...

but my cupboards can only hold so much so I've gotta LET SOME GO...

If you check out my ebay page I got some great items I'm 'releasing' back into the world!

I've listed lots of Vintage fabric DIY cushion pieces - which are being snapped up - and some great bundles/job lots like these....

I've also got some vintage clothes for sale, some of my WittyDawn items and I'm FORCING myself to rationalise my china collection, so these items are up for grabs too !

Why not check my EBAY listings out ;)!

Friday 6 March 2015

AMAZING VINTAGE BARKCLOTH COLLECTION - for sale

Ok I'm having a little clearout


Do YOU like vintage barkcloth fabric ?
Do you like a bargain ?
Would you like to add to your vintage stash WITHOUT slogging  through charity shops/car boots/ebay listings ? ?

CHECK THIS OUT !

Head over to my WittyDawn Facebook Page for details of how to make a bid for this lot -

There's enough fabric in this lot to make the fronts of a LEAST 17 40cm cushions....


Friday 27 February 2015

A little revamp DIY project - Footstool Makeover!

A very satisfying and quite quick revamp / renewal of this little footstool
From this rather sad looking thing ... to this smart little stool with a super vintage Sanderson fabric :)

I really should have taken more pictures of the stages involved BUT if you are interested this is what I did ....


1. Remove feet and strip bank to wood - the old foam etc was rather yucky and NOT for reusing! I didn't bother removing all the tacks on the edges of the wood base as I had a cunnng plan to cover them up and in any case was going to use a staple gun to tack fabric on underneath the stool .
2. I used the wood base  to create a circle tamplate - I used this to cut foam, the polyester wadding circle/strip, and the lining fabric circle and strip and another circle of fabric to sew on underneath to cover up base at the end . I made sure that the side strips of wadding and lining fabric had a generous overlap of fabric to allow them to be stapled to underside of stool base - about 5cm deeper than foam.
3. I handstitched the circle of wadding and side strip of wadding over the foam - now you COULD just use foam by itself BUT the wadding gives a smoother finish - also any roughness in foam edges is masked AND those tacks that I couldn't be bothered to prise off are also covered up :)
4. I machined sewed together the circle and strip of lining fabric - I always prefer to line upholstery projects like this but you could just put your top fabric straight on. You could just use one piece of lining fabric and staple it on BUT if you fit the lining fabric it minimises the pleating/fabric gathers when you come to staple it on-  I think it results in a smoother final finish.
5. Making sure I had a reasonably tight fit I put foam on base , put lining cover on and stapled it on with an upholstery staple gun ( such a useful bit of kit!). Staple underneath at one point first , then pulling fabric fairly tauntly/firmly directly opposite staple again. Do the same but at right angled to you first pair of fixings - so basically you have staple at each quarter of the circle ( sorry this is a bit of a rubbish explanation! you then can work between each set of staples aimimg for lots of small gathers/pleats, rather that one or two larger ones, to get a smooth a finish as you can. What you DON'T do is start stapling at one point and work your way round! you will end up with a huge wad of excess fabric at the end - trust me on this....
6. Then I stapled on my top fabric in same way ( a great vintage Sandersons one - was actually an apron when it came to me!) and trimmed off excess fabric underneath . You will see that I didn't make a fitted cover as I wanted  a single piece of fabric to show off the design. You do have to do a bit more gathering and pleating but it's not difficult if you remember to do lots of small ones :)
7. Finishing time ! I hand sewed a hemmed circle of lining fabric underneath covering up raw edges of wadding/lining/fabric /staples. I then had this very pretty embriodered/scalloped edged floral bias binding which I hand sewed on the bottom edge - it didn't NEED this to cover up anything but it is a good finishing touch. I screwed legs back on through the lining fabric underneath - ALL DONE

When I read it back this looks like a lot of work - it really isn't ! although if you aren't keen on handsewing ( I like it) you might want to skip some of the finishing BUT in my opinion it is those bits that make for a neatly finished project.

Friday 13 February 2015

Bit poorly, weather uninspiring .. perfect time to quilt !

So I've been battling a cold and I'm feeling a bit rubbish ... so I've been quilting!

I'm passing the time working on a hexie quilt  for us ....  ALL handsewn so goodness knows how many hours have gone into THIS one so far ! I think if I were to work it out the labour alone would run into £400 plus!

... however it IS a very pleasent way to pass the time :)


I've also been been finishing some projects to pop in my shop  on Folksy -WittyDawn  

Why not pop over for a look ?

Monday 12 January 2015

January SALE ! - 30% off in my Etsy and Folksy shops!

Better check it out folks!

EVERYTHING is 30% off when you use code 30OFFWITTYDAWN in either my :

ETSY WittyDawnUK shop

OR

Folksy WittyDawn shop


For example - Mice will be reduced from £9 to only £6.30


 Owls will be reduced from £19 to only £13. 30


My popular BOHO bags would drop in price to around £17.50 !

And it would be a great time to get some new cushions for your home in time for Spring!
Remember I make everything from Vintage and thus eco friendly , recycled fabric - good for the planet and great for a unique look too.